Tuesday, May 28, 2013

Bio Diesel Update


The biodiesel project is complete! After washing the concoction and letting it sit for about a week and a half, the water finally separated from the diesel and it is ready to use. The table top recipie I used called for 1 liter of new vegetable oil and 250 ML of sodium methoxide. That mix yielded 875ml of usable biodiesel. The next step is trying it out in the tractor... I'm not sure if I am ready to see the results. It passed the flame test with flying colors... no sputtering or anything. I wonder if there is a better way to test it? I guess it'll be mixed with about 6 gallons of petroleum diesel so it will probably have little effect, even if it was bad.

We'll see soon enough...


Tuesday, May 21, 2013

Natural Pest Control


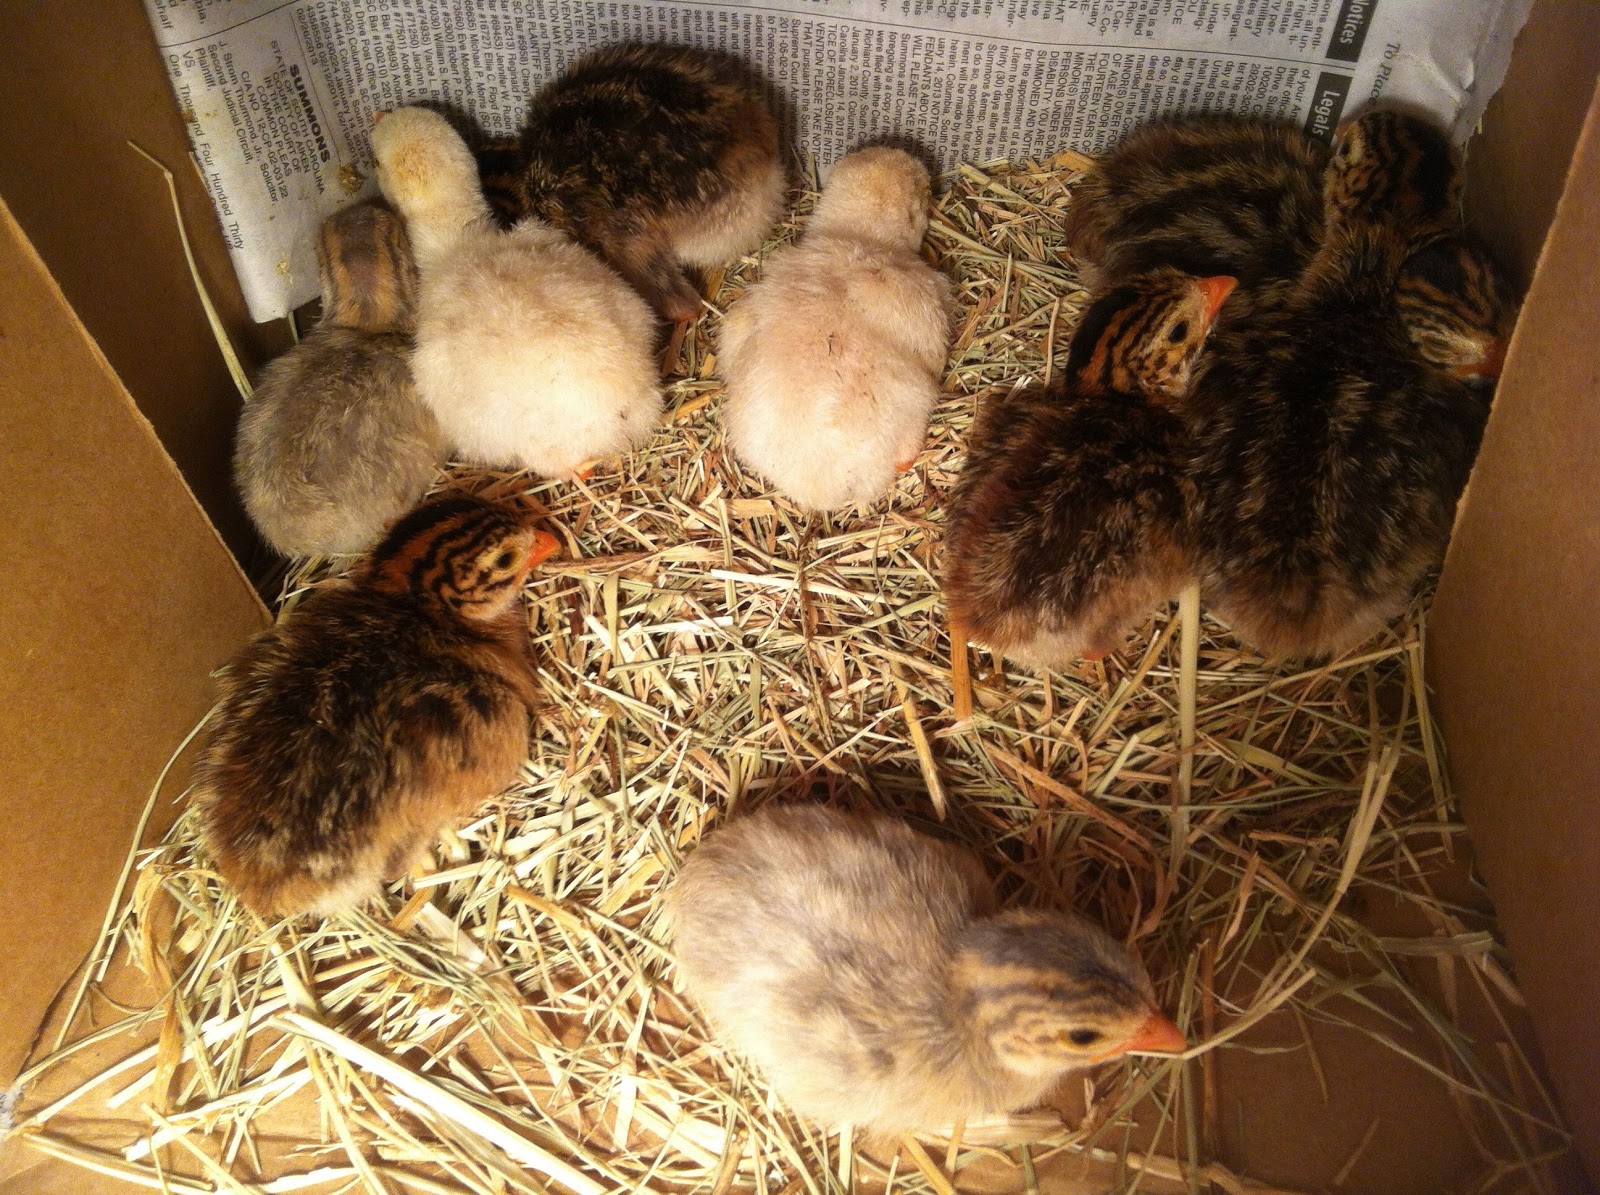
Wouldn't it be great to have built-in, organic pest control for the yard and garden that doubles as an alarm to let you know when people are visiting? Guinea fowl to the rescue! Nine guinea keets of varied colors (helmeted, lavender and white) and joined the staff here at Red Clay last Friday morning after hatching on Thursday and are doing well. Of course, it may be time to get them out of the dining room and into something more secure before they start escaping from their make-shift brooder.

Guineafowl are great for pest control. They patrol the area searching out bugs and sometimes even snakes. I understand that they especially enjoy ticks. They are much more garden-friendly than chickens because they don't scratch the ground looking for food like chickens. As an added bonus, if somebody enters their area, they will raise the alarm and let everyone know. These guys will have the run of the property and hopefully will help us with some outdoor bug control over the summer. Boy, do we need it!

If you're planning to add guineas to your place, here are a few tips:

Don't buy adults because they will most likely wander off an disappear. Guineas imprint on the place they were raised and will feel little attachment to a new home as an adult. They must be brought in a keets if you want them to free range.

Find a reputable local source for your keets. You can buy them from hatcheries for reasonable prices, but hatcheries have rather large shipping fees tagged on to the price at checkout. I found my source on craigslist.org and had a long conversation with her before agreeing to buy from her.

Keep your keets warm and well fed for the first few weeks of life. You can find an abundance of information about brooding guinea keets on the internet by doing a quick Google search so I won't attempt to recreate that info here. The bottom line is this; for the sake of the birds, do some research before jumping in.

These little guys are fun to watch. They are much more amusing than the chickens ever were. Get yourself some guineafowl today and enjoy!


Thursday, May 16, 2013

Aquaponics Update


Just a quick update on the aquaponics experiment....

So far, the goldfish are doing well. I've not found any floaters and they are self-sustaining, subsisting on the algae growing in the tank (of which there is PLENTY). 

The lettuce is doing well. In fact, it is taking over. It is crisp and tasty and makes a great salad. The tomatoes are OK.  I have some sort of fungus developing on them. I think we also have spider mites as well. I'm not sure what to do about that. The pepper plants have been crowded out and are not doing much. I many have to move them around.

The arugula did not do well. Apparently, it does not like to be wet all the time. It bolted quickly then died.

I have recently planted some luffa gord plants in the grow bed with the intent of letting the vine grow and cover the water tank. If it works, then hopefully the plants will shade the tank from the intense SC summer sun.

Wednesday, May 15, 2013

Biodiesel

My First Batch of Biodiesel. The top, lighter layer of
liquid is the biodiesel, the darker layer at the bottom
is the glycerol separated from the cooking oil
A few years ago, I worked with a guy who ran his '80's something Mercedes diesel on used cooking oil he got from a friend of his who ran a diner. He would filter the cooking oil as he poured it into his garage holding tank, and then pumped it straight into the fuel tank when he needed a top-off. I always thought that was a great idea!

It's entirely possible to run a diesel engine like this, but it can cause some problems with the engine over time (which is why my friend used an old car). He said that he would frequently have to change his fuel filter and that his car smelled like french fries going down the road.

There are relatively simple processes that will allow a person to convert used cooking oil (animal or vegetable) into biodiesel that can be used by any diesel engine without the challenges that burning straight, used cooking oil presents. Today I spend an hour or so learning to make my own small batch of biodiesel.

There are many places to find info on the subject of biodiesel brewing, but for this table-top version, I turned to the National Sustainable Agriculture Information Service and their biodiesel page. They have a PDF entitled Biodiesel: Do-it-yourself production basics that has the recipe for this small batch. I was surprised at how easy it was to make it - just three ingredients and about 45 minutes and it was done.

For this particular batch, there are a couple more steps before it is useable biodiesel. I still have to separate the glycerol and wash the biodiesel to remove the soaps, residual glycerol, methanol and lye. Then it should be good to add to Bob the Tractor's fuel tank. The idea of being able to make my own fuel from waste oil is exciting! In the summer we use about 6-10 gallons of diesel every month. That's a $30-$40 savings every month if I could make enough. Plus, it removes waste oil that may be sent to the landfill and is cleaner and more efficient than petroleum diesel.

If you decide that you want to make your own diesel, be careful! The process uses some pretty nasty chemicals; methanol and lye specifically, that are bad for you. Make sure you wear rubber gloves and eye protection. Also, make sure that you don't release the chemicals where they can contaminate the environment.


Thursday, May 9, 2013

Red Clay Alpacas

I am probably crazy but we are now an alpaca farm.

Over the past month I made a deal to purchase a small herd of alpacas. We added 8 registered females and three males (one registered) to the three (unregistered females) we already had. The person who owned them prior to us lost her battle with cancer and her farm was liquidated. These animals needed a new home.

So, what does one do with 14 alpacas? Well... stay tuned and find out. As soon as I figure it out, I'll let you know.

Monday, April 22, 2013

Happy Earth Day!

Today is Earth Day! Take a little time to do something good for this wonderful, beautiful planet that supports and sustains us!

- Plant a tree
- Plant a garden
- Ride a bike
- Walk
- Drive less
- Reduce, Reuse and/or Recycle
- Compost
- Start a worm bin
- Find a way to reduce your energy consumption
- Sit outside and enjoy the fresh air and sunshine
- Think of ways to incorporate some of these things into your day, every day

Happy Earth Day, but lets not limit it to once a year!


Tuesday, April 16, 2013

Aquaponics Experiment Up and Running

40 goldfish all named Dave
After a long time deliberating and trying to find a good source of fish, I finally settled on getting goldfish for the aquaponics experiment (see related posts here and here). They were easy to locate, produce lots of waste and are pretty hard to kill. We've had some goldfish in out animal water tanks (helping to keep them algae-free) for almost a year now. They seem to thrive on neglect.

So, on Sunday, I bought 40 little goldfish and introduced them to their new home. I then planted four tomato plants, three arugula plants, three romaine lettuce plants in the planting bed. I also pulled a bunch of lettuce out of our winter garden to see if it could make the transition.

Three days into the operation with no goldfish floaters and the plants seem to be doing well. I will monitor the water temperature over the summer and see if I will be able to keep it at a suitable temperature for tilapia, or something similar. If so, we will eventually transition over to a more useful fish.
So far, so good. Everything seems to be doing well. Lettuce from our garden is in the foreground and right. Romaine is to the left, arugula to the rear, tomatoes in the middle.

Sunday, April 14, 2013

Worm Bin Expansion

New worm bins in place. 
Today we expanded our worm family by adding this new set of worm bins. This setup was very simple to make. All that is needed to make this is a clean barrel (that didn't hold toxic chemicals in its past life), one 8' 2x4, a jig saw, a drill with 1/4" drill bit and a straight edge and Sharpie marker for marking the barrel.

I simply cut the barrel in half with a jig saw using a multi-purpose blade following the lines we marked on the barrel. Then, to make the cradle, I cut the 2x4 in half to make 2 each 4' sections. Using the barrel as a guide. I marked the 2x4's with the curved profile of the barrel, placed the 2x4s together and gang-cut the barrel profile. For this I used my band saw, but a jig saw will work, too. Finally, I put two 1/4" holes in the low end of each barrel half to allow the barrels to drain.
I added this to show the profile I cut into the 2x4's

That's all there is to it. To set it all up, I placed the 2x4's parallel on an old pallet and put the half barrels on top. After creating the bins, I added shredded paper on one end of the barrel for bedding and wet it down to the consistency of a wet sponge.

We filled the half-barrels with a wheelbarrow load of pre-composted worm food each, leaving the shredded paper uncovered. I dumped a half-tray of worm castings and worms from my Worm Factory 360 into each of the barrel halves on top of the shredded paper, and voila.... a couple of new worm bins are born!

The worms loving their home and food
Completed and filled worm bins

Now we just sit back and let the worms do the work. To help keep the temperature somewhat cool and to maintain moisture, I placed the barrels under a shed and put a waxed cardboard box over top of them.

Waxed cardboard will help keep them from drying out too fast
and help to provide the dark environment the worms love.

Thursday, April 11, 2013

Fall Leaves

My mother had 22 bags of  leaves from last fall sitting at the end of her driveway so I brought them home. There are lots of things you can do with old leaves. They can be composted, turned in to leaf mold, or used as bedding in the chicken run.

Today I put ten bags of leaves in the chicken run. The chickens LOVED it! Apparently, there were some tasty morsels nestled in the leaves because the chickens were scratching and pecking all afternoon long.

Eventually, these leaves will disappear as they are ripped to shreds and eventually buried in chicken poop. We will keep adding leaves until they are all gone. Later in the summer, we will clean out the run and spread the litter as fertilizer in the garden. It will be well-seasoned and high in nitrogen. 

Wednesday, April 10, 2013

The Eggs Are Here!

The chickens are FINALLY earning their keep! These are all eggs produced at the Red Clay Farm by our wonderful chicken staff. Of course, each of these eggs probably cost about $25 a piece, factoring in the building of the coop and six months worth of feed, but with each egg they produce, the cost per egg drops!

Six hens are not going to make enough eggs for us to sell them, but we will have waaaaay more than we need. We are getting 3-4 eggs per day and will probably hit six a day pretty soon.

Let us know if you want some fresh eggs. I think we'll have a few to spare.

Sunday, March 31, 2013

New Kids on the Block

Elvis and Priscilla just hours after being born.
Things have been pretty slow here on the Red Clay Farm until yesterday.

I walked outside to go for a run yesterday morning and heard a strange bellowing coming from the back corner of the pasture. I knew exactly what it was the moment I heard it. For weeks we have been waiting for Prissy to kid. We knew it was imminent because she looked like she was about to explode.

As I got to the back of the pasture I saw Prissy standing over two baby goats. One was up and moving around, the other laying down. As I got closer, I saw that the on laying down had its leg caught in the fence. They were mostly dry and clean so they had been around for a couple of hours, but not much more.

I untangled the leg from fence and tried to get the little kid to walk around. He would not use the let at all. Instead, he would drag both rear feet behind him, kind of like that half of a zombie dragging herself across the town square in that show, The Walking Dead. After some quick research on the 'Net, we decided to splint his legs and see if that helped him. It did. A few hours later, he was up and moving around on all fours, looking rather stylish in his purple and white splints!

Elvis and Priscilla are doing well today. They are strong and active! Unless something bad happens, I believe we got them through the rough patch!

This is Elvis trying to get to his momma and
dragging his leg behind him.
Priscilla just after being born. It's amazing how
quick they are to stand up and get going!

Sunday, March 17, 2013

Donkey Wrastlin' and Plantin'

Saturday was a great day, weather-wise. The sun was shining and it was warm. If I were to have one complaint, it was the wind, which was rather strong. It blew bird houses of their stands, the trash cans went for a tour of the back yard and the buckets I had sitting in the driveway wouldn't stay.

About a week ago, I ordered some plants from Ison's Nursery. They arrived Friday evening, delivered by FEDEX and wrapped in a plastic sheeting and a thick, brown paper bag. I got two more muscadine vines for the grape trellis, four raspberry plants, another pear tree, a peach tree to replace the one the goats killed last year and I couldn't resist trying out a pomegranate tree. So, with buckets, plants and shovel in hand, I headed into the orchard to plant me some trees.

This is the first time I've ever dealt with bare root plants and I sure hope I did things right. For each plant, I dug the hole about twice as large as the roots (except for the pear tree which had really long roots - I would have had to dig to China). Then I took the dirt and mixed it with some home made worm castings in about a 2:1 ratios (dirt to castings). As I filled the dirt back in around the roots, I would add a little water in the hole to help settle it down around the roots.

It took much longer to plant nine plants than I thought it would. It was mid-afternoon by the time I was done. After all that effort, I sure hope they live!

By the time I was done planting, it was time to feed the menagerie. I walked down to the feeding area to get the feed bowls set up and was greeted by 15 hungry animals. (I guess I should explain here that Rosalita, the donkey we acquired in Jan, has proven to be uncatchable ever since the farrier trimmed her hooves two months ago. This is unfortunate, because she has a bad case of thrush and her hooves are over grown and need lots of attention) Rosalita got just a little too close to me and a quickly grabbed her halter. When a 350# donkey doesn't want to be caught, it can put up quite a fight, but I managed to hang on and drag her out of the pasture.

I tied her up to the horse trailer and fed her separately, trying to make this as pleasant an experience a possible. I brushed her, gave her a carrot and then started working on her feet. That's when the real fun began. It was a tussle, but I managed to clean, treat, and file her hooves as best I could. Buddy the farm dog was a casualty, though. He got a little too close to the action and took a hoof to the right shoulder. No permanent damage, but I think he developed a very health respect of the donkey at that moment.

Anyway... That was my Saturday at the Red Clay Farm. At the end of the day, I was dead tired, but it was a good tired! Lots of fresh air and sunshine. Spring is in the air here in SC!

(Editor's Note: I will add pictures later. One of the things I've got to do better is take more pictures. Nothing is more boring than a blog without pictures! Who wants to read all the time?)

Sunday, March 10, 2013

A Very Blue Trailer

When you have a farm, even a small one like ours, you need a flat bed trailer. They are handy for all sorts of things; hauling tractors, hauling hay, picking up 16' fence panels or hay rings, or even for transporting five cubic yards of mushroom compost.

I bought this trailer a few months ago. It is a well-constructed, sturdy trailer with a 7000# capacity, but it had a few problems. First, the brake lights didn't work, and second, the tires are in horrible shape.

So what started out as fixing the brake lights turned out to be a major project. I first started out to fix the taillights but once I managed to unbolt them, it became clear that they were unfixable. The body of the lights were rusted through and wire casings were cracked. I decided to scrap them and buy new ones.

Of course, if I buy new lights, I might as well re-wire the trailer while I'm at it, right? And before I bolt the new lights in place, I ought to clean and paint the tail light bracket so it doesn't rust any more. Once I painted the tail light brackets, I decided I might was well paint the rest of the trailer while I'm at it. Oh, and the wood could probably use some wood preservative since I don't have a shelter to park the trailer under; Thompson's Water Seal to the rescue!

So here it is, in all its blue glory. In retrospect, blue probably wasn't the best color for the trailer. But it does now match the tractor color, as you can see in the picture. Plus, blue is my favorite color. The paint job is what you would expect from a spray can paint job. It has its share of runs, drips and oversprays, but it still looks better than it did before. Bob the tractor will look sweet riding on this trailer!

All this and I STILL don't have the brake lights on or the tires changed! It's not safe, but it looks good and that's what's important!

Pre-Composting Worm Food


I love my experiments!

We've been throwing old produce into the compost bin and layering it with alpaca manure for the past week. The intent is to pre-compost it just enough and feed it to the worms. As you can see by the thermometer (even if it is kind of hard to see), we've started to see an increase in the temperature. It hit 120° today. I expect that it will reach 130° - 140° sometime this week and then start to drop off. When the temps start to drop, I'll mix it up and let it cook again. In about two more weeks, it will be perfect worm food - soft, mushy, rotting and loaded with bacteria and fungus. Yum, Yum!

Isn't science cool?

Wednesday, March 6, 2013

IBC Aquaponics

I finally finished building the aquaponics experiment I wrote about earlier in the year. This week I got it filled with water and have the pump going to cycle the water. All that's needed now is a source of fish so I can stock the thing.

Here's a list of what I needed to build this system, cost and sources.

IBC Container - Craigslist.org - $75. (Delivered)

Two each 2"x4"x10 - Lowe's - $7.

1" PVC pipe and misc fittings - Lowe's - $23.

4x65# bags Sunleaves Rocks Growing Medium (.5-1.5" diameter) - The Urban Garden - $97.50

EcoPlus Submersible Pump ECO1056 and 1" flex tube - The Urban Garden - $82.75

All totaled, I've spent about $280. on my experiment. That's not especially cheap, but not too expensive, either. I'm not sure how much fish will cost me yet but as soon as I find a good source I will update this post or add another.

Monday, March 4, 2013

Alpacas Join the Team

I've always said that I would like to raise alpacas. They are great animals. They are clean, pretty easy keepers, easy on the land and just so darn cute!

Well, this week, Mrs Red Clay Farmer purchased three learner alpacas for me as a Army retirement gift. These girls have been pets for the past year or so and the previous owner decided he was too busy to keep them. They are named after the characters from the Golden Girls. Dorothy is the white one, Rose is Brown and Blanche is the black one. They came with two donkeys as well - Scarlet, the mom and her son, Harpo.

The girls and Harpo have made the transition to the farm and seem to be well adjusted. Scarlet, on the other hand, has not made it to our place yet. She has proven to be a challenge to catch and seems to be very happy at her old home. We are going to make one more attempt to bring her home later in the week.

Monday, February 25, 2013

Grape Pruning Time

February is grape vine pruning time, or so I've heard. I don't think the grapes on our trellis have ever been pruned and the trellis is a little worse for wear as the posts rot from the top down and the cross beams are dry rotting as well.

Back in early January, I got motivated to cut out all the wisteria vines that had wrapped themselves around the trellis and interwoven themselves among the grape vines. That was quite a chore. Once I chopped out all the vine pieces, I shredded them in the chipper and mixed them with a pile of horse manure to do a little bit of composting. Later in the spring, I will spread the piles out on the pasture.

This week, I pruned back the grape vines in accordance with the guidance I found in the Ison's Nursery and Vineyard website here. They provide a variety of guidance on how to care for grape vines, fruit tress and more. I also ordered my strawberry plugs from them and was very pleased with the plants I got.

Anyway, here are the before and after shots. Hopefully I didn't cut they back too much. I am looking forward to a good grape harvest this year!


Here's what the trellis and vines looked like before I pruned them. This fall, there was more wisteria than grape vine.


Here's how it looks now. I replaced a few cross boards and straightened the trellis. That big pile in the middle is grape vine trimmings.

Thursday, February 21, 2013

Sustainable Williamson Project

I wanted to take a moment to share a project from a fellow Appalachian State University alum who is making a difference in the World!


From his most recent email release:

Dear Friends,

On March 1st, 2013, we are launching our campaign in an effort to raise support for making the coalfields of central Appalachia sustainable and economically diverse! 

Our hope is to start a movement to make Williamson an example to other communities in central Appalachia and across the nation, changing how we approach economic diversification and sustainable development.

We aim to create a replicable model from our existing projects that positions Williamson as a hub for sustainability throughout the central Appalachian region.

We invite you to join us, taking action in sharing this campaign with your friends, family, communities, and networks. And as we begin our Campaign Tour across the east coast, stay tuned to our upcoming event to join us the national celebration for sustainability. 

We sincerely appreciate your support, and look forward to working with all of you over the next two months and beyond! Get excited with us! 


The Sustainable Williamson website goes live on 2 March. Check it out if you have a chance.

Tuesday, February 19, 2013

The New Garden Update

The garden is slowly taking shape!

I added four cubic yards of mushroom compost from Allen's Market this week and mixed it in with the tiller. Then, planted two rows of potatoes (both white and red), a row and half of onions (white, yellow and red) and seven cabbage plants. We're not too fond of cabbage in our family, but we are going to try it again. Maybe it tastes better when you've grown it yourself. I sure can't wait for things to start growing!

The folks at Allen's were very helpful when it came to offering advice on planting the potato and onion sets I bought from them. As I've said before, I'm pretty inexperienced in this gardening stuff. They also have some very reasonable prices on started plants. You get a three pack of plants for $1.00 - not too bad.

As for our sustainability score, I think we get an A+ for expanding out garden area. This new garden will really expand our ability to grow our own food. We probably get a D for the addition of the mushroom compost, though. While the compost will definitely improve our growing capacity, I later learned that it was shipped from mushroom farms all the way up in Pennsylvania. That's a long way to transport compost and I'm sure required a fairly significant quantity of fuel to get it here (and all the other places it was shipped). In the future, I will have to find a more local source of compost.

Saturday, February 9, 2013

Prepping a New Garden

We broke ground on a new garden this week. After all, it is the season to start planing! This brings us to two garden plots now. We started one beside the house the first summer we were here.

This particular garden is going to be a challenge. It's a 35' x 30' plot on a little bit of a slope. The area where we placed it used to be grass (kind of), and I've spent hours trying to rake out all the grass roots but they seem to keep popping up. I know I will be pulling grass out of the garden all summer long! Being on a hill, I sure hope the dirt doesn't all run out of the bottom side in a big rain storm.

I will be adding some mushroom compost to it soon because it is nothing but hard, red clay with a few rocks here and there. It definitely needs some organic material in it. It probably also needs a little lime added. We have some pretty acidic soil here.

We are going to plant some potatoes and onions in the near future. I think that's all we can plant at this time. It's not quite warm enough for anything else.

More to follow...